Your PC’s memory, also known as RAM (Random Access Memory), is a critical component that plays a fundamental role in its overall performance. When your PC starts exhibiting symptoms of sluggishness, freezing, or crashing, it’s essential to investigate whether memory issues might be the culprit. In this guide, we’ll walk you through the process of diagnosing and troubleshooting RAM problems on your PC.
What does RAM do? Understanding RAM
Before diving into diagnosis and troubleshooting, let’s briefly understand what RAM does. RAM is where your computer temporarily stores data that is actively being used or processed. It allows for quick access to this data, which is vital for smooth multitasking and overall system performance. Insufficient or faulty RAM can significantly impact your PC’s speed and stability.
Common Symptoms of RAM Issues
- Slow Performance – Programs take longer than usual to load, and the overall responsiveness of your system is reduced.
- Frequent Freezing – Your PC freezes or hangs frequently, especially when running multiple applications simultaneously.
- Crashes and Blue Screens of Death (BSOD) – Your computer crashes unexpectedly, displaying error messages such as the infamous BSOD.
- Error Messages – You may encounter error messages related to memory, such as “Out of Memory” or “Memory Management Error.”
How to Diagnose RAM Problems
- Task Manager
- Open Task Manager (Ctrl + Shift + Esc) and navigate to the “Performance” tab.
- Check the Memory section to see how much RAM is currently in use and whether it’s unusually high when no intensive programs are running.
- Memory Diagnostic Tool
- Windows has a built-in Memory Diagnostic tool that can help identify memory issues. We will elaborate on how to run this below.
- Third-Party Diagnostic Software
- There are several third-party memory diagnostic tools available, such as MemTest86 and Prime95.
- Download and install one of these tools, then follow the instructions to run a thorough memory test. These tools often provide more comprehensive testing than the built-in Windows tool.
- Physical Inspection
- Ensure that your RAM modules are properly seated in their slots on the motherboard.
- If you’ve recently installed new RAM or made any hardware changes, double-check compatibility and ensure that all components are installed correctly.
Using the Windows Memory Diagnostic Tool
The Windows Memory Diagnostic tool is a built-in feature in Windows designed to identify memory issues.
- Accessing the Windows Memory Diagnostic Tool
- Type “Windows Memory Diagnostic” into the Windows search bar and press Enter.
- Alternatively, you can access it by restarting your PC. During the boot process, Windows might prompt you to run the Memory Diagnostic tool if it detects memory problems.
- Tap or click to open the Memory Diagnostics Tool.
 You might be asked for an admin password or to confirm your choice.
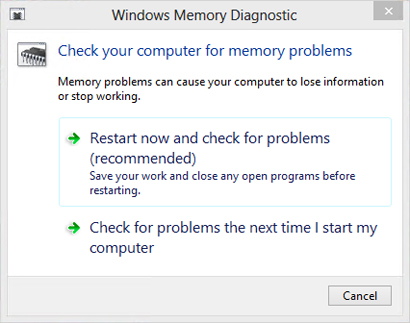
- Choose Testing Option
- You’ll see two options: “Restart now and check for problems (recommended)” or “Check for problems the next time I start my computer.”
- Select the option that suits you. If you choose to restart immediately, the test will commence upon reboot.
- Running the Test
- Your screen will display diagnostic tests as Windows checks your RAM for errors.
- The test duration depends on your RAM size and system speed.
- Viewing Results
- After the test completes, Windows will boot back into the desktop.
- To view results, check the Windows Event Viewer under “Windows Logs” > “System” for entries with “MemoryDiagnostics-Results” as the source.
- Here, you’ll find information about any errors or issues detected during the test.
- Interpreting Results
- If errors are detected, the tool will provide information about the problem, such as memory corruption or hardware failures.
- Based on results, take action like replacing faulty RAM modules or adjusting BIOS settings.
- Repeat if Necessary
- Run the test multiple times to confirm issues and validate results.
- If troubleshooting multiple RAM modules, run the test with one module installed at a time.
How to Troubleshoot RAM Issues
- Remove and Reinsert RAM
- Power down your PC.
- Open your PC case and carefully remove each RAM module.
- Clean the contacts with a soft, dry cloth and reinsert the modules firmly into their slots.
- Test Individual Modules
- If you have multiple RAM modules installed, try removing one at a time and testing your system’s stability.
- This can help identify whether a specific module is faulty.
- Replace Faulty RAM
- If you’ve determined that one or more RAM modules are faulty, consider replacing them.
- Ensure that any replacement modules are compatible with your motherboard and meet your system’s requirements.
- Check for Other Hardware Issues:
- Sometimes, RAM issues can be caused by other hardware components, such as a failing power supply or overheating CPU.
- Monitor your system’s temperatures and check for any signs of hardware malfunction.
Diagnosing and troubleshooting RAM problems on your PC requires patience and attention to detail. By following the steps outlined in this guide, you can identify and resolve memory issues that may be affecting your system’s performance and stability. Remember to regularly maintain your PC’s hardware and keep an eye out for any signs of trouble to ensure smooth operation in the long run.
 Prices for Reliable Memory